It can be overwhelming when designing plastic parts. The complex injection molding process, vast material selection, and wide range of operating settings can create confusing design limitations. It can be a significant advantage to understand the specific criteria that can prevent major manufacturability and quality issues further down the line.
Plastic part development can be broken out into 4 phases including Concept & Design, Mold Design & Build, Mold & Part Qualification, and Production. Autodesk Moldflow is changing the way plastics parts and molds are designed by assisting with each of these phases. Concept & Design should be looked at as the foundation of the process and is just as important as Production.
.png?width=539&name=Screenshot%20(53).png)
Just like most Concept to Production workflows, the cost of change is cheaper during the earlier phases and only goes up as it gets closer to full production. It is very important to invest the time upfront to capture as many potential issues before moving onto the planning of production. Good communication should be used to express concerns during this phase to potentially prevent rework.
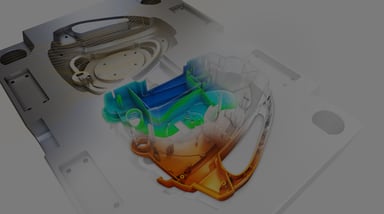
Once a part is designed, there are three main features that need to be evaluated and those include nominal wall thickness, draft angle, and undercuts. If these are evaluated prior to moving onto a flow analysis, a lot of time can be saved, and a better understanding of underlying issues can be developed.
.png?width=1287&name=Screenshot%20(55).png)
Wall Thickness
Most engineers who have dealt with plastics in their careers have heard that the most critical aspect in design is the wall thickness. Obviously cost savings are the highest when components have a minimum wall thickness if that thickness is consistent with the part and mold filling functionality. Due to the inherent nature of the process, there are practical limits on the wall thickness vs. manufacturability. As the part gets thinner, the 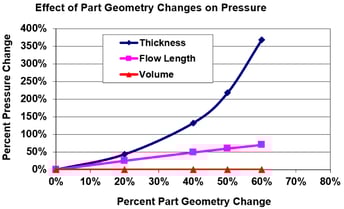 pressure required to fill the mold goes up, which will challenge the machine capacity. As the part gets thicker, the processing time, material costs, and chances of defects goes up. It is critical to find a happy median to maintain quality and cost of the part. The rule of thumb is that the pressure required to fill should be 50-75% of the capacity of the injection unit. Since injection molding is a pressure-driven process, the molten polymer will take the path of least resistance, which makes the variation from the nominal wall thickness very critical. That means when there is a variation in wall thickness the plastic will preferentially flow through the thicker wall, which can lead to unbalanced filling patterns, air traps, or weld lines.
 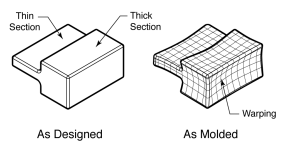 Additionally, plastics are inherently poor heat conductors, so by maintaining a uniform wall thickness the part will cool as uniformly as possible to reduce warpage. Many applications often make it difficult to maintain a constant nominal wall because of conflicting part design constraints. When a variation in wall thickness is required, there are a few guidelines that should be followed. Make thickness transitions gradual and minimize the variation in wall thickness to 25%
 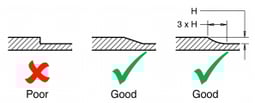 as a standard in amorphous resins. It can be as low as 15% variation in wall thickness for semi-crystalline resins. Establishing a nominal wall is one of the most important decisions an engineer makes when designing an injection molded plastic part. The nominal wall influences the overall dimensions of the part, the part performance, and the manufacturing requirements.
Draft Angle
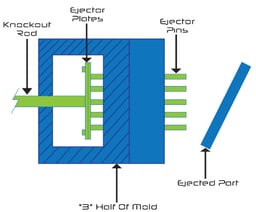 Another important step for creating a successful finished product is to think about how the part will be ejected from the machine. The angle, referred to as draft, is positioned to run toward the direction of a mold’s pull and parting line to help release the part from the mold. An ice cube tray is a great example of conceptualizing draft at work. By accounting for
 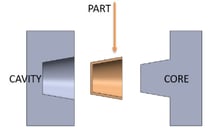 shrinkage during the cooling process, draft angles greatly reduce friction between the finished, cooled part and the side of the mold. Not only does this create a much easier ejection process, it offers several other benefits. It reduces the chance of damage to the part due to friction during release, reduces wear and tear on the mold, and reduces overall cooling time by lessening the need for unconventional ejection setups. As a rule of thumb, the draft angle of 1 ½” to 2 degrees is required for most parts with a mold depth of up to 2 inches and will increase an additional degree for every inch of mold depth. Material and mold texture directly impact the amount of draft required. Complex geometries such as ribs or gussets still should incorporated draft angle at the points of contact with the mold. At a bare minimum, half a degree of draft should be incorporated into vertical surfaces if there are design constraints. Adding draft to a part will most likely create nominal wall thickness variation. Where draft is required, it will then be important for the user to keep within the nominal wall thickness range driven from the material type. A lack of draft can lead to rejected parts, damaged molds, longer cooling times, and complex part ejection requirements.
Undercut
Undercuts are protrusions or recessions in a part that prevent the mold, after the part is formed, from sliding along the parting direction. These features inhibit the direct removal of the core, 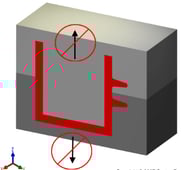 and as a result, addition mold pieces such as a side-core or an internal
 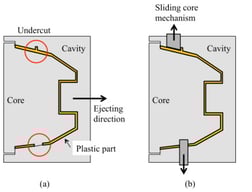 core lifter are needed to form the shape. Undercut designs are often used to create threaded parts and snap-on products for a variety of consumer goods. Undercuts are not necessarily a bad thing, but they should be evaluated at the design phase to discover if they are needed and the increased mold cost should be noted.
Do you use any of these tips and tricks in your daily workflow? Feel free to brag about your success in the comments!
Like what you’ve read? Subscribe to our blog!
Feel free to share on Twitter or Facebook!