

Recently I was working with a client who wanted to more precisely format an iPart table’s Part Number and Member columns to include the length of the part. Sounded easy enough, but there were a couple of catches.
First, they wanted the lengths formatted to use 3 decimal places and secondly, they wanted every size from 1.000 to 144.000 at 1/8-inch increments. Doing some quick math (dangerous on a Friday, I know) that’s 1,145 rows! Way too many to key in by hand and what if there’s a change… Yikes! Thankfully there’s a simple and powerful way to accomplish this, without breaking our fingers; utilizing Excel to edit our iPart tables. Let’s take a few minutes to stroll through this process, using a simple example.
By necessity one must first create the iPart from the manage tab and then I strongly recommend taking the time to manually setup the first row with the exact formatting required. This can eliminate pesky table errors and conflict messages in the future. Click OK to exit the iPart table.

Manually Edit the iPart Table to Match the Desired End Format
To leverage the power of Excel, right – click on the new Table icon in the Browser and choose the “Edit via Spreadsheet…” option. This will launch Excel and allow us to utilize all its robust functionality to automate aspects of the design. Please note that changes to the iPart table will only take affect after saving and closing the spreadsheet.

Edit the iPart Table via Excel
The incoming table contains cells that are initially formatted as simple text or general and all the values are independent.
To tie these cells together, I’m going to utilize the “CONCATENATE” function to build my part number in a more automatic fashion, by including both simple text and the value from the Length column. Note the subtle difference between the initial value of cell B2 and after the addition of the “CONCATENATE” function. To ensure consistency between the Member and Part Number Columns, one can simply set the Member Cell A2 = B2.

Initial Cell Value for the Part Number Column

Utilize the CONCATENATE Function to Include Part Number Text and the Value of the Length Column
I’m not going to take the time to add 1,145 rows, but I will add a couple more values in the Length column to illustrate how robust this method can be. Unfortunately, when I add the values of 6 and 12, the numbers do not fit the 3-decimal place format requirements. To achieve this formatting, right – click on the column header “C” and alter the cell format to utilize a 3-decimal place Number format. Click OK and vertically “drag” copy the cells A2 & B2 to match the 2 additional Length values, as shown below.

Reformat all the Cells in Column “C” to Use a 3-Decimal Place Number Format

Results from “Drag” Copying Cells A2 / B2 to Rows A3 / B3 & A4 / B4
The copy process worked (mostly) ! The Member and Part Number cells are now utilizing the Length values, but as we can see there is a problem; the 3-decimal place formatting has somehow been lost. Unfortunately, by default, Excel eliminates the zero characters from numbers during the text conversion process. Fear not, though, all is not lost! Again, leveraging the power of Excel, we can alter the way the Length values are converted in the Part Number cells. There is an interesting function, “TEXT” that allows a TON of flexibility when converting numbers into text. While there are seemingly a million different ways to format the number, I’m going to substitute the simple formula, TEXT(C2,”.000”) in place of the C2 value for Cell B2. Drag copy this format to the other Member and Part Number cells and note that the specified formatting is achieved. Save and close the spreadsheet to engage the changes to the Inventor model. Open the iPart table to see the results.
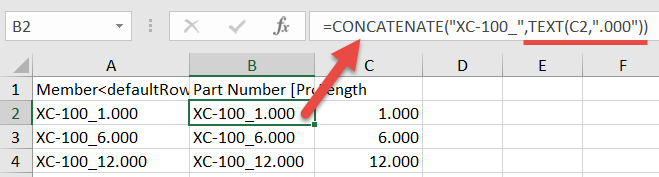
Utilizing the TEXT Function Achieves the Desired Part Number Formatting

Editing the iPart Table in Inventor Reveals the Spreadsheet Updates
Voila! Using Excel allows us much greater control to achieve the desired iPart table formatting that we needed. One additional perk to using Excel with iParts, is that the Excel spreadsheet RETAINS the cell formulas whenever future edits are required! We’ve just scratched the surface of Excel’s capabilities, but hopefully this simple example helps you see the power of using Excel for iPart table editing. As always would love to read your comments or questions below. Hope all is well, happy blogging and have a most blessed day! - Pete Strycharske
Do you use any of these tips and tricks in your daily workflow? Feel free to brag about your success in the comments!
Like what you’ve read? Subscribe to our blog!
Feel free to share on Twitter or Facebook!


