

I once had a client ask how they could compute the total mass of an assembly in their drawing’s parts list. After some back and forth, I showed him how to extract the mass value for an entire assembly and place that into his title block (which I’ll discuss in a future post). However, during the discussion, we demonstrated a couple of tools that we don’t use very often, substituting a value in an Inventor Parts List and then grouping the values together. In part 1 of this mini-series, I’m going to lay out the steps to use a value substitution for the estimated cost.

Image of the Homemade Desk Riser Concept
Honestly, I don’t use the mass too often, however I’m often concerned about component costs. For example, in this homemade desk riser assembly, I’m interested in figuring out how much the parts are going to cost, and not just one part, but the whole quantity of parts. In order to quantify this on a print, I’m going to modify a standard parts list.

Initial Parts List
The first step to edit this Parts List is to add the Estimated Cost column.
However, this Estimated Cost column will just be the individual component cost and I want to show the total cost for the entire quantity of an item. In order to do this, I’m going to perform a value substitution for these column values.
The following steps will help us accomplish the task:
1) Right click on the Parts List and choose the Edit Parts List command.2) Select the Column Chooser tool and select the Estimated Cost column to the Parts List.
(To see the Results click Apply and note the resulting Parts List.)

Add the Estimated Cost Column
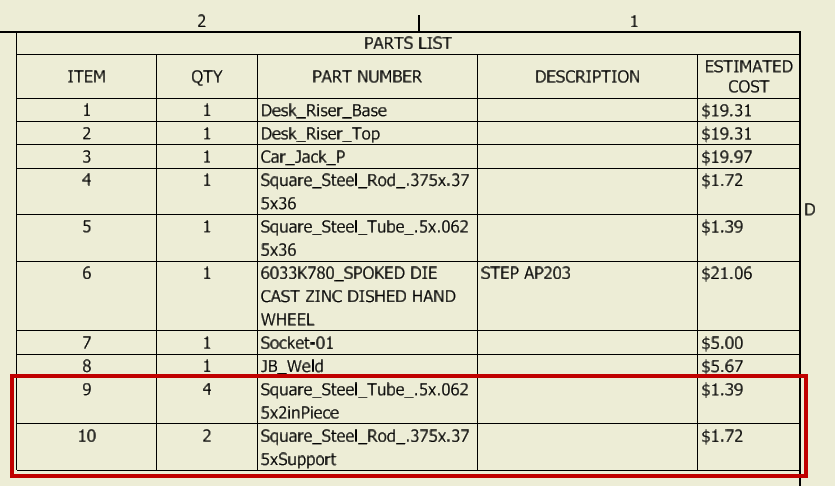
Parts List with the Estimated Cost Column (Note the Bottom Two Items)
3) Now that the Estimated Cost column is added, right click on the Estimated Cost column heading and choose the Format Column tool.

Choose the Format Column Tool to Set the Stage for the Value Substitution
4) Choose the Substitution tab, set the Radio Button to Enable Value Substitution, use the value of Estimated Cost and then merge the rows as Sum of Values.
5Click OK to exit the Format Column tool and then click OK to exit the Parts List editor.
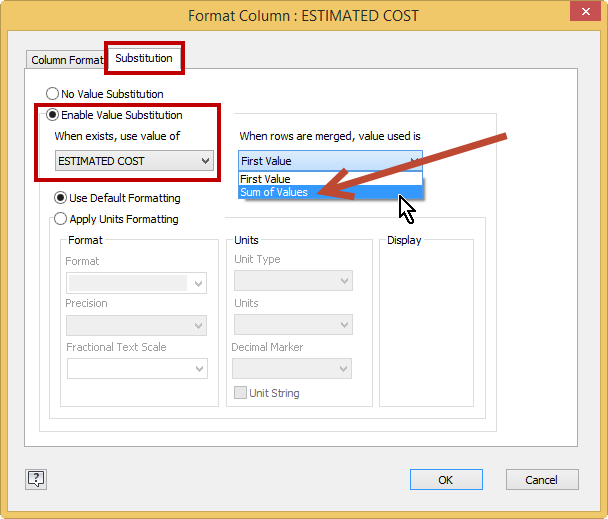
Change the Estimated Cost Column Values from First Value to Sum of Values
Parts List with the Updated Substitution Values (Note the Bottom Two Items)
So that’s how one can show the total cost for the entire quantity of a particular item.
This technique isn’t just limited to Estimated Cost, it can be many different property values. Give it a try and leave a comment to let me know what you think. In the next post, I’ll demonstrate how to group the components together to be able to gather the cost for an entire category of items. Until then, hope this helps, happy blogging and have a most blessed day! Pete Strycharske
Do you use any of these tips and tricks in your daily workflow? Feel free to brag about your success in the comments!
Like what you’ve read? Subscribe to our blog!
Feel free to share on Twitter or Facebook!


