

Manipulating a 3rd Party Assembly: Part 3
Conditionally Suppressing Problematic Features
In this final post of my 3-part mini-series Manipulating a 3rd Party Assembly, I’m following up on the lengthy part manipulation post from last week, where we learned how to parametrically manipulate the non-native CAD model in Inventor. However, we had some potential issues when we had a parametric value got set to “0” (zero) in certain conditions, which can be a bad thing.
This post will walk us through the process of performing conditional suppression, “turning off” features based on those zero value parameters, using a couple of different techniques; feature properties and iLogic.
Whenever a geometric parameter value is set to zero, weird things can happen. Sometimes, the part features straight up fail, other times geometry can switch directions (invert when positive values are re-entered), situations that most designers would like to avoid. However, when positioning or lengthening features relative to each other, like we did last week, zero – values for geometric parameters are sometimes unavoidable. Instead of fighting with the inevitable and wracking our brains trying to avoid these situations, it is much easier to just “turn off” features with zero – value parameters by suppressing them.
Suppressing a feature disables the feature, but leaves it present in the model browser for future use. This is a useful technique for conceptual designs, troubleshooting model errors or unique situations like we find ourselves working through in this series. Manual suppression can be engaged by right – clicking on a feature and choosing the Suppress Features option from the overflow menu.

Right Click on a Feature to Manually Suppress the Feature
While manually suppressing / un-suppressing features works just fine, you can probably see how this isn’t the most efficient process, especially when there could be multiple features to “turn off”. Also, this method doesn’t anticipate problems. Imagine trying to explain to Pete the engineer that he must turn off a feature BEFORE editing the parameters to use certain values.
That situation has disaster written all over it! We must find a way to automate this process…
Thankfully we can, using a technique called conditional suppression.
Conditional suppression does exactly what the names indicates; suppress features only when certain conditions are met. There are two main approaches to doing this, via the feature properties or utilizing iLogic rule writing. Let’s look at the feature properties first.
To access the feature properties, right – click on the desired feature and select the Properties option. In the middle area of the dialog box, there is a section which allows us to set the conditions for the suppression. In this case, we’ll only suppress the feature if the New_Position parameter equals zero, as shown in the figure below. Test out the conditional suppression by setting the Bed_Length parameter equal to the Orig_Position parameter and note the results.

Access the Feature Properties
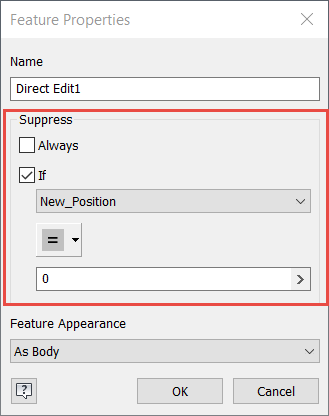
Direct Edit 1 Feature Conditionally Suppression Settings
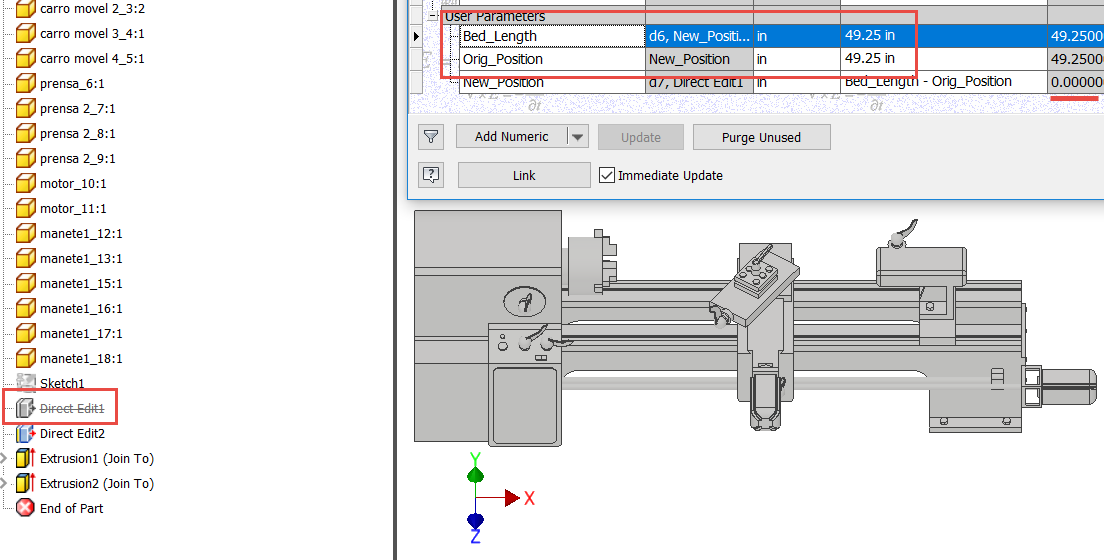
Conditional Suppression Test, Note Direct Edit 1 is Suppressed
Choose the same settings for the Direct Edit 2 feature and you should experience the same result. Change the Bed_Length parameter to any other value and notice that the Direct Edit features become un-suppressed. This is a relatively easy way to enact conditional suppression to match up with specific NUMERIC parameter values.
Sometimes, however, there are wholesale changes that need to be applied to a model to achieve the desired results.
In addition to this, there may be scenarios where NON-NUMERIC parameters are required to drive the changes. In these scenarios, the feature properties method won’t work very well, and we’ll have to engage the iLogic method. iLogic is a great technique for automating design changes, as it is based on writing rules. Some of these rules are quite simple, like the rules we’ll be writing in this post, and some of them reach into the very guts of Inventor to create whole new files. We could write entire books on how to utilize iLogic, so we’ll have to be satisfied with just a brief foray into iLogic today.
To start, go back into the feature properties again and uncheck the If box to the disable the earlier conditional suppression.
Then engage the iLogic browser by clicking the + symbol next to the Model browser. Finally, right – click in the iLogic browser and create a new rule called “Conditional_Suppression”.

Access the iLogic Browser
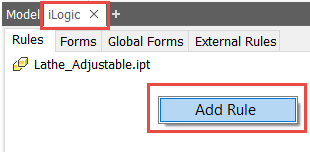
Right Click to Add a New iLogic Rule
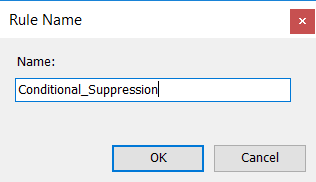
Name the Rule “Conditional_Suppression”
In this rule, we’re going to simply check to see if the New_Position parameter equals zero. If that condition is true then we’ll suppress the Direct Edit features. Otherwise, we’ll un-suppress them, as we’ll want those features active to adjust the model. This is the foundation of much of what is done in iLogic, writing conditional logic, which can fire anything ranging from simple manipulations to some extremely complex operations.
Perhaps in future posts, we’ll show various aspects of iLogic, but it’s always best to keep things simple when first starting out.
So essentially, our rule is done, other than a little piece of code, called a snippet, that will automatically update the model geometry. See the image below to view the rule and some of the snippets used to create it. As before, be sure to test the various conditions; rule of thumb: less than original value, equal to the original value and greater than the original value.
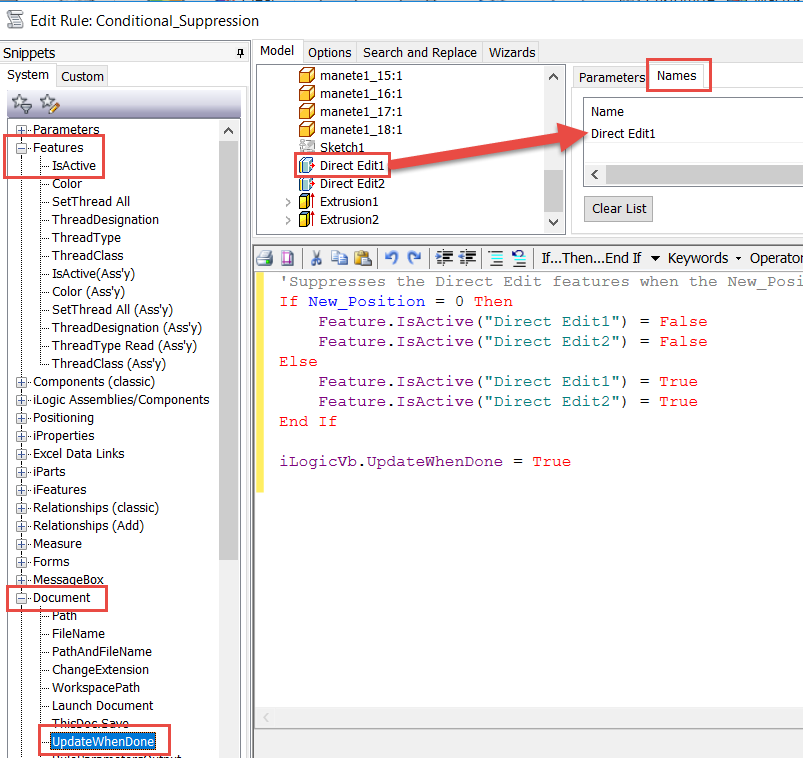
View of the iLogic Rule and the Snippets Utilized
So now you have a couple of techniques at your disposal when running into design situations where features need to be suppressed for specific parameter values. Thanks for joining me on this 3-post ride through working with a 3rd party assembly in Inventor! Hopefully you’ve gleaned some helpful thoughts, but as always, if you have any questions, comments or requests for future posts, please let me know in the comments below. Happy blogging and have a most blessed day! Pete Strycharske
Do you use any of these tips and tricks in your daily workflow? Feel free to brag about your success in the comments!
Like what you’ve read? Subscribe to our blog!
Feel free to share on Twitter or Facebook!


